
Integrate ChatGPT into a Next.js app
Instruction on how to integrate ChatGPT into a Next.js app
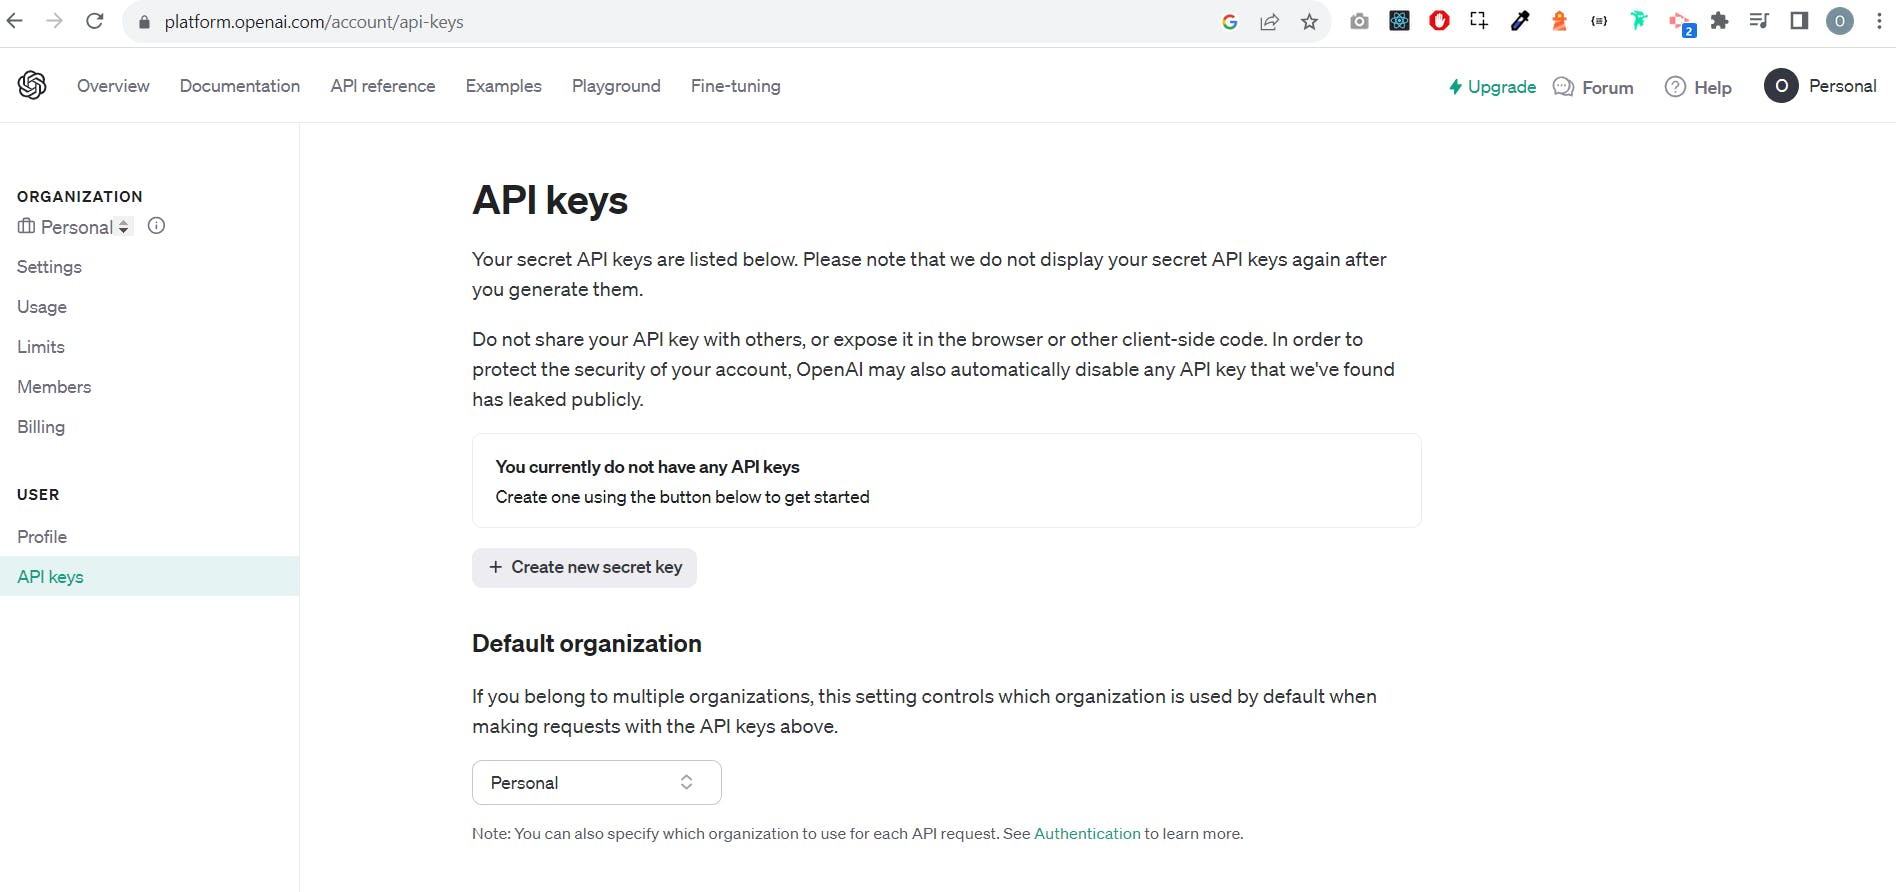
Set Up Your OpenAI Account:
Sign up for an account with OpenAI and obtain your API key.
Create next.js app
To create a project, open the terminal, go to the needed directory, and run:
1npx create-next-app@latestInstall OpenAI sdk
Openai library provides convenient access to the OpenAI REST API from TypeScript or JavaScript
1npm i openaiCreate an endpoint:
In your Next.js project, create a chat-gpt endpoint within your app/api directory.
1// app/api/chat-gpt/route.js
2
3import { NextResponse } from 'next/server';
4import OpenAI from 'openai';
5
6export async function POST(request) {
7  const openai = new OpenAI({
8    apiKey: process.env.OPEN_API_KEY,
9  });
10
11  const params = await request.json();
12
13  const response = await openai.chat.completions.create({
14    model: 'gpt-3.5-turbo',
15    messages: [
16      {
17        role: 'system',
18        content:
19          'You are a poetic assistant, skilled in explaining complex programming concepts with creative flair.',
20      },
21      {
22        role: 'user',
23        content: params.prompt,
24      },
25    ],
26    temperature: 1,
27    max_tokens: 256,
28    top_p: 1,
29    frequency_penalty: 0,
30    presence_penalty: 0,
31  });
32
33  return NextResponse.json(response);
34}
35
The purpose of this endpoint is to get some params.prompt from the user, send it and get a response from chat-gpt.
You can set the tone of how ChatGPT would communicate to the user:
1  {
2        role: 'system',
3        content:
4          'You are a poetic assistant, skilled in explaining complex programming concepts with creative flair.',
5      },
Set Up Environment Variables
Create a .env.local file in your Next.js project root and add your OpenAI API key.
1OPEN_API_KEY=your_api_key_hereMake sure to replace your_api_key_here with your actual OpenAI API key.
Create the form for user input
1// components/PromptForm.js
2
3import { useState } from 'react';
4import styles from './PromptForm.module.css';
5
6const PromptForm = ({ isLoading, onSubmit }) => {
7  const [prompt, setPrompt] = useState('');
8
9  const handleInputChange = (e) => {
10    setPrompt(e.target.value);
11  };
12
13  return (
14    <form
15      onSubmit={(el) => {
16        el.preventDefault();
17
18        if (prompt === '') {
19          return;
20        }
21
22        onSubmit(prompt);
23        setPrompt('');
24      }}>
25      <label>Question</label>
26      <input
27        className={styles.input}
28        type='text'
29        value={prompt}
30        onChange={handleInputChange}
31      />
32      <input type='submit' disabled={isLoading} className={styles.btn} />
33    </form>
34  );
35};
36
37export default PromptForm;
Use the created endpoint in your app
1// app/page.js
2
3'use client';
4import { useState } from 'react';
5import styles from './page.module.css';
6import PromptForm from '@/components/PromptForm';
7
8export default function Home() {
9  const [choices, setChoices] = useState([]);
10  const [isLoading, setIsLoading] = useState(false);
11
12  const onSubmit = async (prompt) => {
13    setIsLoading(true);
14    const response = await fetch('./api/chat-gpt', {
15      method: 'POST',
16      headers: {
17        'Content-Type': 'application/json',
18      },
19      body: JSON.stringify({
20        prompt: prompt,
21      }),
22    });
23
24    if (response.ok) {
25      const result = await response.json();
26      setChoices(result.choices);
27    }
28    setIsLoading(false);
29  };
30
31  return (
32    <main>
33      <div className={styles.card}>
34        <h1>Next.js with Chat-GPT</h1>
35        <h3>Write your question</h3>
36        <PromptForm isLoading={isLoading} onSubmit={onSubmit} />
37
38        {choices.map((choice) => {
39          return (
40            <p key={choice.index} className={styles.response}>
41              {choice.message.content}
42            </p>
43          );
44        })}
45      </div>
46    </main>
47  );
48}
In this example, the PromptForm component allows the user to type a message, sends it to the OpenAI API using the onSubmit function, and displays the response.
Remember to adjust the styling, error handling, and other features according to your specific application needs. Additionally, make sure to handle API rate limits and potential errors from the OpenAI API in your production code.
The complete project source code you can find here