
Why Redux and How Redux Toolkit Simplifies the Process
Learn why Redux is great for managing state and the challenges it brings. See how Redux Toolkit cuts down on boilerplate, simplifies async logic with thunks, and improves development with built-in tools for a better React experience.
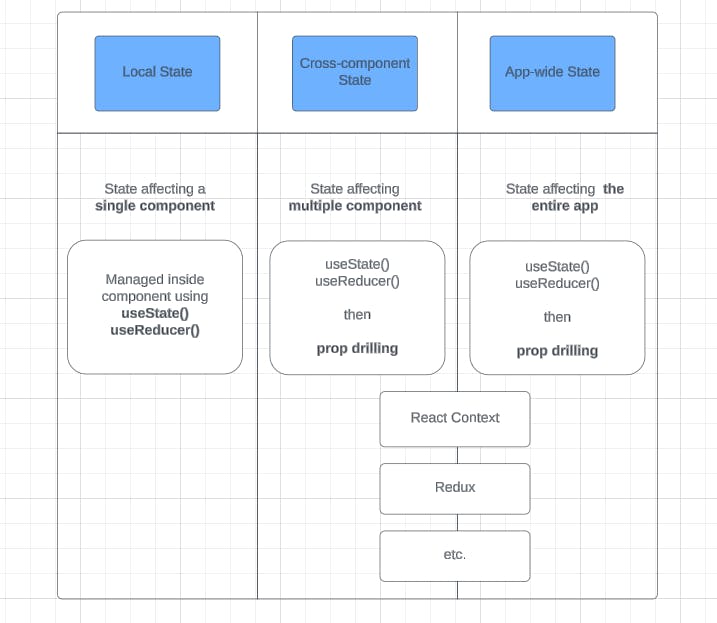
Types of state in React app
Context API issues
React Context has some potential disadvantages:
Deeply nested providers or Complex Provider
Deeply nested providers are a common issue when using React Context, especially in applications with multiple contexts. Each context provider needs to wrap its consumer components, and when multiple contexts are used, this can lead to deeply nested provider trees.
1 <AuthProvider>
2    <ThemeProvider>
3      <SettingsProvider>
4          <App />
5      </SettingsProvider>
6    </ThemeProvider>
7  </AuthProvider>
Performance Issues:
- Re-renders: When the value of a context changes, all components that consume that context will re-render. This can lead to performance issues if the context is used by a large number of components or if the context value changes frequently.
- Optimization Complexity: Preventing unnecessary re-renders can require additional effort, such as memoizing context values or splitting context into smaller, more granular contexts.
How Redux works
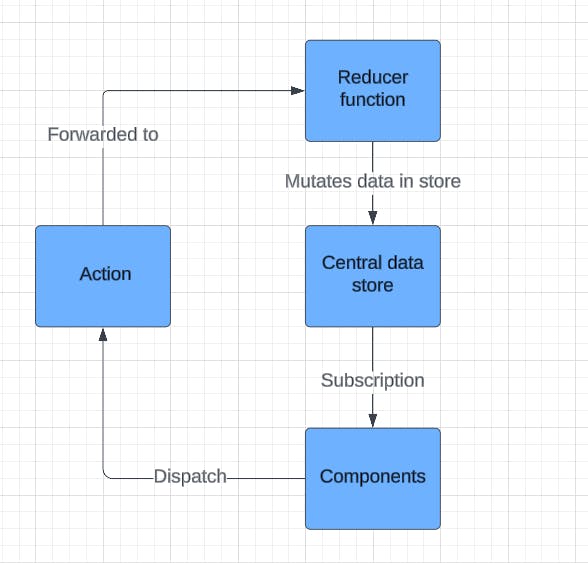
Core principles:
- Single Source of Truth: The application state is stored in a single object tree called the store. This makes it easy to track, debug, and manage the state of your app.
- State is Read-Only: To change the state, you can't modify the state directly. Instead, you must dispatch an action, which is a plain JavaScript object describing what happened in the app (e.g., { type: 'INCREMENT' }).
- Changes are Made with Pure Functions (Reducers): Reducers are functions that take the current state and an action and return the new state. They are pure functions, meaning they don't have side effects like API calls or direct state mutations. This ensures the state transitions are predictable.
The basic flow of Redux works as follows:
- The application dispatches an action (a plain object describing what happened).
- A reducer receives the current state and the action, then calculates and returns a new state.
- The store holds the entire state of the application and notifies all registered components of the state changes so that they can update accordingly.
Here’s a simple Redux flow in code:
1// Action
2const increment = () => ({
3  type: 'INCREMENT',
4});
5
6// Reducer
7const counterReducer = (state = 0, action) => {
8  switch (action.type) {
9    case 'INCREMENT':
10      return state + 1;
11    default:
12      return state;
13  }
14};
15
16// Create Store
17const store = createStore(counterReducer);
18
19// Dispatch Action
20store.dispatch(increment());
Redux Challenges & Introducing Redux Toolkit
While Redux provides a structured way to manage state, it has its challenges, especially for newcomers:
- Boilerplate Code: Redux can involve writing a lot of repetitive code (e.g., actions, action types, reducers, and constants), making it cumbersome to set up even for simple scenarios.
- Manual Setup of Middleware: Adding middleware (like redux-thunk or redux-saga) for side effects or asynchronous actions requires manual setup, adding complexity to the configuration.
- State Management Overhead: For smaller applications, using Redux can feel like overkill, adding extra weight where simpler solutions (like React Context or local component state) might suffice.
To address these challenges, the Redux Toolkit was introduced. It simplifies the process of writing Redux logic and offers several key advantages:
- Reduced Boilerplate: Redux Toolkit abstracts a lot of the repetitive code by providing utility functions like createSlice, createAction, and createReducer. It simplifies reducers and action creation into more manageable chunks.
- Out-of-the-box Best Practices: It comes pre-configured with common middleware like redux-thunk, DevTools integration, and enhanced reducer development through the use of Immer for immutable updates.
- Development Efficiency: Redux Toolkit includes development-friendly features such as automatic action type generation and better error handling. It also encourages the use of modern Redux patterns.
Here’s an example using Redux Toolkit:
1import { createSlice, configureStore } from '@reduxjs/toolkit';
2
3const counterSlice = createSlice({
4  name: 'counter',
5  initialState: 0,
6  reducers: {
7    increment: state => state + 1,
8    decrement: state => state - 1,
9  },
10});
11
12export const { increment, decrement } = counterSlice.actions;
13
14const store = configureStore({
15  reducer: counterSlice.reducer,
16});
17
18store.dispatch(increment());
This is more concise and eliminates the need for manually writing action creators and reducers separately.
Redux & Side Effects
In most applications, not all actions are synchronous or pure. Often, you need to handle side effects, such as making API calls, dispatching actions based on timeouts, or interacting with external resources. Redux, being purely synchronous and based on pure functions, doesn’t handle these scenarios directly.
To manage side effects, middleware like redux-thunk and redux-saga are often used.
- Redux Thunk: This middleware allows you to write action creators that return a function instead of an action. Inside these functions, you can perform asynchronous operations like API calls and then dispatch actions based on the results.
Example using redux-thunk:
1// Action creator with Thunk
2const fetchUserData = (userId) => {
3  return async (dispatch) => {
4    const response = await fetch(`/api/users/${userId}`);
5    const data = await response.json();
6    dispatch({ type: 'SET_USER_DATA', payload: data });
7  };
8};
9
10// Dispatch thunk action
11store.dispatch(fetchUserData(1));- Redux Saga: This middleware handles side effects more declaratively using generator functions. It provides more advanced control over handling complex asynchronous tasks and cancellation.
Example using redux-saga:
1import { call, put, takeEvery } from 'redux-saga/effects';
2
3function* fetchUserData(action) {
4  const data = yield call(fetch, `/api/users/${action.userId}`);
5  yield put({ type: 'SET_USER_DATA', payload: data });
6}
7
8function* watchFetchUserData() {
9  yield takeEvery('FETCH_USER_DATA', fetchUserData);
10}
Action Creator Thunk
With Redux Thunk, you can delay the dispatching of an action until an asynchronous operation (like fetching data) is completed. This can be done by returning a function from the action creator that receives the dispatch method as an argument.
Here’s a quick breakdown:
- The function can dispatch actions before and after the async logic (e.g., starting an API call and handling the response).
- You can dispatch multiple actions in sequence based on different results (e.g., REQUEST_STARTED, REQUEST_SUCCESS, and REQUEST_FAILURE).
1const fetchPosts = () => {
2  return async (dispatch) => {
3    dispatch({ type: 'FETCH_POSTS_REQUEST' });
4    try {
5      const response = await fetch('/api/posts');
6      const data = await response.json();
7      dispatch({ type: 'FETCH_POSTS_SUCCESS', payload: data });
8    } catch (error) {
9      dispatch({ type: 'FETCH_POSTS_FAILURE', error });
10    }
11  };
12};
Side Effects in Redux Toolkit
With Redux Toolkit, handling side effects is commonly done using thunks (asynchronous action creators).
1. Thunks in Redux Toolkit
Redux Toolkit has a built-in helper called createAsyncThunk, which simplifies writing async logic and dispatching related actions (like loading, success, and failure states). createAsyncThunk automatically generates action creators for each of the steps of an async process (pending, fulfilled, and rejected).
How createAsyncThunk works:
- It wraps your asynchronous function (like a fetch request).
- It automatically dispatches pending, fulfilled, and rejected actions.
- You can handle these actions in your reducers without manually writing them.
Here’s a basic example:
1import { createSlice, createAsyncThunk, configureStore } from '@reduxjs/toolkit';
2
3// Async thunk for fetching user data
4export const fetchUserData = createAsyncThunk(
5  'users/fetchUserData',
6  async (userId, thunkAPI) => {
7    const response = await fetch(`/api/users/${userId}`);
8    const data = await response.json();
9    return data;  // This will be the payload of the fulfilled action
10  }
11);
12
13// Slice that handles state and action reducers
14const userSlice = createSlice({
15  name: 'users',
16  initialState: {
17    userData: null,
18    status: 'idle',  // idle | loading | succeeded | failed
19    error: null
20  },
21  reducers: {},  // You can define other non-async reducers here
22
23  // Extra reducers handle actions dispatched by createAsyncThunk
24  extraReducers: (builder) => {
25    builder
26      .addCase(fetchUserData.pending, (state) => {
27        state.status = 'loading';
28      })
29      .addCase(fetchUserData.fulfilled, (state, action) => {
30        state.status = 'succeeded';
31        state.userData = action.payload;
32      })
33      .addCase(fetchUserData.rejected, (state, action) => {
34        state.status = 'failed';
35        state.error = action.error.message;
36      });
37  }
38});
39
40// Configure store
41const store = configureStore({
42  reducer: {
43    users: userSlice.reducer,
44  }
45});
46
47// Dispatch async thunk action
48store.dispatch(fetchUserData(1));
How createAsyncThunk simplifies side effects:
- Automatic Action Types: No need to manually define actions for different states (like "loading", "success", or "error"). Redux Toolkit generates these for you.
- Error Handling: If the promise is rejected (e.g., due to an API error), the rejected action is automatically dispatched, and you can handle it in your reducer.
- Access to State/Dispatch: Inside the thunk, you can also access the store’s dispatch and getState via thunkAPI, which can be helpful for conditional logic based on the state.
Example of accessing dispatch and getState in a thunk:
1export const fetchDataWithCondition = createAsyncThunk(
2  'data/fetchDataWithCondition',
3  async (arg, thunkAPI) => {
4    const state = thunkAPI.getState();
5    if (state.someCondition) {
6      // Do something or return early
7    }
8    const response = await fetch('/api/data');
9    return await response.json();
10  }
11);
2. Handling Thunks in Slices
With Redux Toolkit, you handle async actions (created with createAsyncThunk) in the extraReducers field of a slice. These reducers listen for the actions that createAsyncThunk automatically generates, such as:
- Pending: Dispatched when the async process starts (e.g., an API request is sent).
- Fulfilled: Dispatched when the async process completes successfully (e.g., data is returned).
- Rejected: Dispatched if the process fails (e.g., an error occurred).
By using extraReducers, you keep your async and sync logic neatly separated, and createAsyncThunk allows you to manage loading states and errors easily.
1extraReducers: (builder) => {
2  builder
3    .addCase(fetchUserData.pending, (state) => {
4      state.status = 'loading';
5    })
6    .addCase(fetchUserData.fulfilled, (state, action) => {
7      state.status = 'succeeded';
8      state.userData = action.payload;
9    })
10    .addCase(fetchUserData.rejected, (state, action) => {
11      state.status = 'failed';
12      state.error = action.error.message;
13    });
14}
Traditional Thunks in Redux Toolkit
While createAsyncThunk is the most common way to handle async logic in Redux Toolkit, you can still write traditional thunks (just like in standard Redux) using dispatch and getState. This is useful when you want more control over the process or when createAsyncThunk doesn't fully meet your needs.
Here’s how you can write a traditional thunk:
1// Traditional thunk using dispatch and getState
2export const fetchUserData = (userId) => async (dispatch, getState) => {
3  dispatch({ type: 'FETCH_USER_DATA_START' });
4
5  try {
6    const response = await fetch(`/api/users/${userId}`);
7    const data = await response.json();
8    dispatch({ type: 'FETCH_USER_DATA_SUCCESS', payload: data });
9  } catch (error) {
10    dispatch({ type: 'FETCH_USER_DATA_FAILURE', error: error.message });
11  }
12};
Key Advantages of createAsyncThunk
- Simplified Syntax: It removes the need to manually write pending, fulfilled, and rejected action creators.
- Built-in Error Handling: The rejected action type is dispatched automatically if an error occurs, and you can handle it in your reducers.
- Automatic Action Type Generation: Redux Toolkit generates action types in a predictable format, reducing boilerplate and potential naming conflicts.
Redux DevTools
Redux DevTools is a powerful extension for debugging your application’s state changes. It allows developers to:
- Track Actions: See the exact actions that were dispatched, making it easier to identify what is happening in the application.
- Inspect State: View the current state before and after each action, which helps in tracking how state evolves in response to dispatched actions.
- Time Travel Debugging: You can jump back and forth through state changes to examine how different actions influenced the state. This helps in debugging and testing without restarting the application.
- Action Replay: DevTools can replay a series of actions to reproduce bugs or check how changes in the code affect previous states.
To integrate Redux DevTools into your Redux store, it’s as simple as adding a line in your store configuration:
1import { configureStore } from '@reduxjs/toolkit';
2
3const store = configureStore({
4  reducer: rootReducer,
5  devTools: process.env.NODE_ENV !== 'production',
6});
This enables DevTools in development mode and disables it in production for performance reasons.
Conclusion
When managing global state in React, Context API works well for simple use cases, but as applications grow, it introduces several challenges. Deeply nested providers and performance issues caused by unnecessary re-renders can become problematic. While there are ways to optimize React Context, like memoizing values or breaking up contexts, it can add complexity.
Redux offers a more structured solution for handling application state with its predictable state management pattern. By centralizing state and following a strict unidirectional data flow, Redux makes state transitions easier to track and debug. However, traditional Redux comes with its own issues, such as the excessive boilerplate code and complexity involved in setting up middleware for side effects.
To tackle these challenges, Redux Toolkit was introduced. It simplifies Redux by reducing boilerplate, providing built-in support for side effects with thunks, and improving the development experience through Redux DevTools integration. With createAsyncThunk, managing asynchronous logic like API calls is more straightforward, reducing the need for manual action creation for loading, success, and error states.
In the end, Redux Toolkit offers a clean, efficient way to manage state in large-scale applications. It addresses the limitations of both React Context and traditional Redux, making it the recommended choice for modern React applications that require powerful state management, side effect handling, and a great development experience.